
ESE101: Switching from Assembly to C Part 4
Last time I explained why thinking and programming in C is better than assembly: C lets us think at a higher, more abstract, and more expressive level than assembly.
I’d like to pick up again with TI’s blinky example in C and explain what it’s doing. But I can’t.
I can’t because TI’s Code Composer Studio (CCS) won’t run any more. Why not? I have no idea. It gives some opaque error message when launching. I tried some basic Googling and didn’t find anything helpful. I suspect the software got rusty, or perhaps I left the batteries in it for too long and they got acid all over CCS. That will teach me for not writing ESE101 posts for more than a year!
So I gave up on CCS version 7 and will walk through installing the latest and greatest CCS version for this post. The current latest version is 8.1.0.00011 (wow, that’s a lot of digits).
This post is going to look a lot like the post where I updated to CCS 7 from CCS 6, so if it seems familiar that’s why.
Install the latest CCS by:
1. Download the appropriate “Offline Installer” here: http://processors.wiki.ti.com/index.php/Download_CCS#Download_the_latest_CCS
If you run Linux, please read the warning on that page about unsupported kernel versions.
2. Start the installation process and select the MSP430 product family like this:

3. Click through the rest of installation steps for CCS.
4. Once it’s done, launch CCS and it should automatically check for updates, which it will probably need. Install those updates and restart CCS. Make sure you’re using CCS 8 - you might still have CCS 7 on your system.
Alright, we’ve got Code Composer Studio 8 up and running. Let’s have it create a basic blinky example for us:
1. Select “New Project”.
2. In the form window that pops up, enter:
- Target: MSP430x5xx Family
- And to the right of that select: MSP430F5529
- Project name: whatever you like, I called mine “ese101-blinky-C”
- Under “Project templates and examples” choose “Blink The LED”.
- Leave everything else as-is.
3. The form should look like this when you’re done:

After you click Finish you should see something like this:

Now to actually run the C code!
1. Plug your MSP430 board into your computer.
2. In CCS, select Run->Debug, or click the picture of the little bug in the toolbar.
3. A window talking about power/energy measurement may pop up. If it does, check “Do not show this message again” and then select Proceed.
4. CCS will download the code to your MSP430 board.
5. You may see this “Error initializing emulator:” popup window:
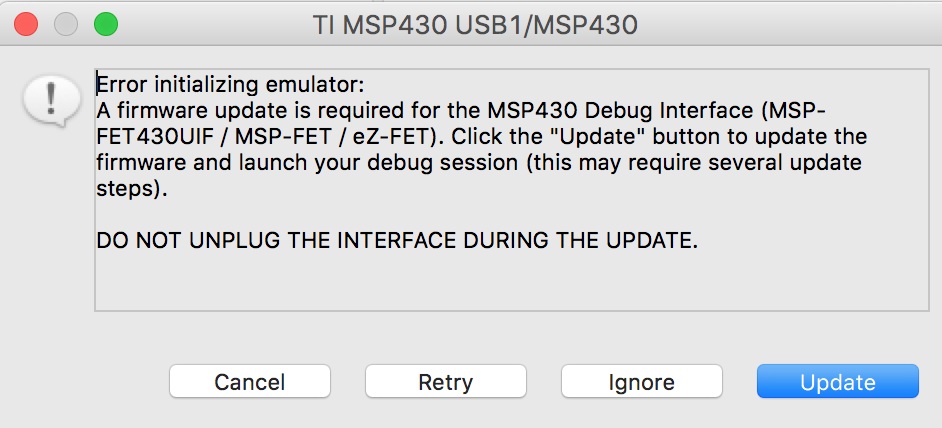
This terrifying message means that the firmware running on the board that lets CCS talk to your MSP430 chip needs to be updated. Select “Update”.
6. Select Run->Resume and the code will start running on your MSP430 board.
7. The red LED marked P1.0 should start blinking a few times a second.
Voilà! You’re running C code!
You can pause the code (Run->Suspend) and single step (Run->Step Over) through it exactly as we did with assembly code previously in ESE101.
Try changing the value of the variable ‘i = 10000’ to 30000, recompile the code (Project->Build Project or click the little hammer icon), select “Yes” when CCS asks if you want to reload the newly built file to the MSP430 board, then let the program run with Run->Resume (or click the play/pause button).
What happens? Does the LED blink faster or slower? Why?
If you need a reminder please go back to the first ESE101 post where we used CCS - it goes into detail about what that ‘i = 10000’ variable is used for. That post also explains how to set and use breakpoints in CCS, which is the same in CCS 6, 7, and 8. (CCS 6, 7, and 8 work identically for me for everything I’ve tried so far.)
Next time we’ll step through the C code and explain what it’s doing in detail.
This post is part of a series. Check out the complete Embedded Software Engineering 101 series here.